NorDB Command Line Tool
NorDB comes with a handy command line tool for managing the database. Most of the basic functions are available through it, without using the API. This tutorial goes through all of the functions in the nordb command line tool. Every single command in nordb has a help page which can be accessed with –help/-h flag alongside your command.
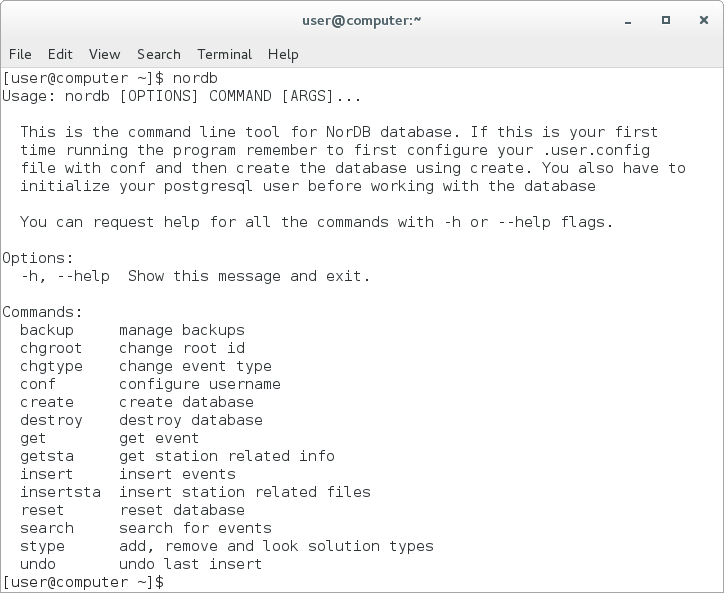
1. Screenshot of the NorDB terminal command
Backup - Backing up your database
This command is accessed by:
nordb backup [OPTIONS] database_name
nordb backup wraps all backup related commands into a single easy command. It has four optional flags to choose from, which are:
- –create / -c create a database backup file
- –load / -l - load a backup file and create a database out of it
Each of the options have a simple command line interface as it prompts the required information from the user. Use the key in the list given by the program to choose which backup file you want to choose for your operation
Chgroot - Changing the root id of the event
As described in Database Structure, the events in the database are attached to event roots, which are hub events which tie different analyses of same events together. You can change the event root of an event with Chgroot command:
nordb chgroot [OPTIONS] EVENT_ID ROOT_ID
Here EVENT_ID refers to the event of which’s root id you want to change and ROOT_ID refers to the root to which you want to attach the event. If you don’t want to attach the event to an existing root id, you can just use -9 as the ROOT_ID and the program will attach the event to a different root.
Chgtype - Changing the solution type of the event
Every event will also be attached to a solution type in the database. This tells the user how the solution has been made and what is its relation to other solutions from the same event. More information about solution types can be read from the entry for stype command. You can change the solution type of the event with the command chgtype:
nordb chgtype [OPTIONS] EVENT_ID SOLUTION_TYPE
EVENT_ID refers to the event of which’s solution type you want to change and SOLUTION_TYPE refers to the solution type to which you want to change into. All solution types except for the default ones need to be added to the database first with stype command! If the solution type to which you are changing into does not allow multiple events of same solution types inside same event root and if there already is an event that has the same solution type to which you are changing to, the database will change the solution type of the other event into ‘O’.
Conf - Configuring database username
Configuration managment command for the nordb database. Without parameters this command will list all database configurations that have been configured before. There are four subcommands which are: ‘add’, ‘remove’, ‘change’ and ‘alter’.:
nordb conf [OPTIONS] [CONF_ARG]
add: adds a new configuration to the database. The command asks for all the necessary parameters for configuring your database. The parameters asked are:
- Configuration name: This is the identifier of the certain configuration. You cannot have multiple configurations with the same name.
- Database name: The name of the database in your postgresql server. Usually just nordb, but custom names will be allowed in future releases
- Username: your postgresql username. If you want to create the database with this user, it will have to have the required postgresql rights.
- Password: your usernames password. This is not safe yet! Try to use not proper passwords when using nordb as this password will be saved into your nordb installation.
- Location: (local/remote) Whether your database is in your local computer or remote machine.
- Host ip: ip of your remote machine.
- Host port: Port of your remote machine where the postgresql server is running
alter: lets you alter an existing database configuration
change: changes the active database to another configured database. You can give the command the database name after the change command or with the interactive tool
remove: removes a existing database configuration from the database. You can give the command the database name after the remove command or with the interactive tool
Create - Create the database from scratch
Before you can use any database functionalities of nordb, you have to initialise all the tables with create command. The functionality is simple:
nordb create [OPTIONS]
This will create an postgres database with name nordb to your local machine. If you want to re-create your existing database remember to run the destroy command before creating the database or use the reset command instead.
Createuser - Adds users to your database
This command will create a new user to your database. You can only user this command if you are the database admin or owner:
nordb createuser [OPTIONS] ROLE USERNAME
ROLE: the role which the user will have in the database. This can be one of: guest, default_user, station_manager or admin USERNAME: username of the new user
Destroy - Destroy the database
This command will remove the nordb database from your computer. Remember to backup your database before deleting it as the database cannot be recovered after destroy:
nordb destroy [OPTIONS]
Get - Get nordics from the database
This command fetches Nordic Events from the database and recreates them in the format of users choice. Basic usage is:
nordb get [OPTIONS] [EVENT_IDS]... OUTPUT_NAME
EVENT_IDS here is a list of integers which tell the program which events to get from the database. OUTPUT_NAME is the name of the file or path to file to be written. For example command:
nordb get 1 5 19 6 output
would fetch nordic events with event_ids 1, 5, 19, 6 and write a nordic file called output.n from them in the given order.
Get also has options which are:
- –event-root
- -f/–output-format
Event root flag tells the program to search the events by root id instead of event id. If for example three events with ids 182, 981 and 1023 would refer to same event root id of 107, command:
nordb get --event-root 107 output
would fetch all events referring to the nordic root id and write a nordic file out of thmm.
Format option changes the file format of the written event. Currently the nordb program can translate the nordic files into quakeML files and seiscomp3 SC3 files. default value for the option is nordic. You have to specify to the option which format do you want by writing
- n - nordic format
- q - quakeml
- sc3 - SC3 seiscomp format
after your option flag:
nordb get -f q 1 output
Nordb get will append the correct filename extension to your output-name, which are .n for nordic files and .xml for quakeml and sc3 files.
Getresp - Get response files from the database
Get response file from the database by id and write it to a file:
nordb getresp [OPTIONS] FILENAME RESPONSE_ID
This requires you to know the id of the response, which in it’s current form is hard to find. Hopefully this will be solved later.
Getsta - Get station files from the database
Getsta fetches station information out from the database with the id of the station. The basic usage of the command is:
nordb getsta [OPTIONS] [STAT_IDS]... OUTPUT_NAME
Getsta STAT_IDS refer to the integer ids of the station files in the database and OUTPUT_NAME ferers to the name of the file outputted by the command.
Getsta has one relevant option: -f/–format. Which tells the program which format you want to get out from the database. As in css format, the station files are usually saved to different flat files, specifying “site”, “sitechan”, “sensor” or “instrument” to the command will only fetch the one corresponding file. If “all” is given, the program will output all four relevant files. If “stationxml” is given to the option, the program will transform the station information into stationXML format.
Insert - Insert Nordic Files to the database
This command is the main way of adding nordic files to the nordb database. It only works for files in the nordic format. The basic format for the command is:
nordb insert [OPTIONS] SOLUTION_TYPE FILENAMES...
SOLUTION_TYPE tells the command the type of the solution of the nordic files to be pushed into the database. Filenames refer to all files that will be read and pushed to the database.
The options for nordb insert are:
- -nf/–nofix
- -ig/–ignore-duplicates
- -n/–no-duplicates
- -a/–add-automatic
–nofix tells the program to not use automatic fixing tool to fix some common mistakes in nordic files. Be warned that the files probably wont be pushed to the database if this option is put on.–ignore-duplicates tells the program to ignore all identical Nordic Events that already exist in the dabase. –no-duplicates tells the database to ignore all same or similar events found on the database and just assume that the events pushed do not exist on the database. –add-automatic tells the program to automatically add the event to the first found event root without prompts from the user. All similar events will be ignored.
Insertresp - Insert response files to the database
Add a response file to the database. Currently it only reads responses in FAP or PAZ response format. You can give the command any amount of response files you want.
Insersta - Insert station files to the database
This command adds a site file to the database. If you have a collection of station related information in CSS3.0 format(site, sitechan, sensor, instrument) you can add all of them by naming them similarly and using the correct filename extensions (for example station_network.site, station_network.sitechan, station_network.sensor, station_network.instrument) and using the -a/–all_files flag for the insert command.:
nordb insertsta [OPTIONS] STATION_FILE [NETWORK]
- The options for nordb insertsta are:
- -a, –all-files
NETWORK tells the program to which network you want to add the files. Make sure they already exists with network command
Network - Manage station Networks
This command is for managing station networks. Argument ‘list’ lists all existing networks. Argument ‘add’ adds a new network to the database. Argument ‘remove’ removes a network from database. Both ‘add’ and ‘remove’ command are interactive so no further arguments are needed. ‘add’ command also asks for the privacy level of the network. See more information about privacy levels in the ‘Database Structure’ page.:
nordb network [OPTIONS] NETWORK_COMMAND
Removeuser - Remove users from the database
This command removes a user from the database.You have to be admin to run this command and you cannot remove the database owner with the command. Give the username of the user to be removed as a parameter to the command.:
nordb removeuser [OPTIONS] USERNAME
Reset - Reset database
Resets the database to it’s orginal form but keeps the tables intact. WARNING: this command will delete all information in the database. Possible options for RESET_TYPE: ‘all’, ‘events’, ‘stations’. Defaults to resetting everything:
nordb reset [OPTIONS] [RESET_TYPE]
Search - Search for events in the database
Search database for events. Search command without any parameters will print out all events in the database so be careful with your queries if you have a lot of events in a database.:
nordb search [OPTIONS] [CRITERIA]...
- search command options are:
- -v/–verbose: Print the whole nordic file in search instead of only the main header
- -o/–output: path to a file to which all the events which fall under your query will be written into
- -f/–output-format: Format of the output. Either nordic, quakeml or sc3 format. Defaults to nordic(‘n’, ‘q’, ‘sc3’)
You can give as many criteria for the command as you want, but multiples of same type of criteria don’t work yet. There are four types of searches you can do: exact, upper-bound, lower-bound and inbetween searches. The syntax for those are:
- exact: value=10 -> Everything that has exactly a value of 10
- upper-bound: value=10- -> Everything that has value lower than 10
- lower-bound: value=10+ -> Everything that has value higher than 10
- inbetween: value=10-15 -> Everything with their value being between the range of 10 and 15
The possible search parameters are with their possible abbreviations:
origin_date: origin_date, date or d Search for events that happened on a certain date range. Syntax for date can either be in form of ‘date=29.08.2015’ or in julian date form ‘d=2015013’
origin_time: origin_time, time or t Search for events that happened on a certain time frame. Syntax for time can be like ‘origin_time=16:12:01’, ‘time=16:12’ without the seconds or ‘t=16’ only with the hour.
epicenter_latitude: epicenter_latitude, latitude, la Search for events with latitude. Syntax for latitude will always be a float: ‘latitude=30.123+’
epicenter_longitude: epicenter_longitude, longitude, lo Search for events with longitude. Syntax for longitude will always be a float: ‘lo=60.312-’
magnitude_1: magnitude_1, magnitude, mag, ma, m Search for events with magnitude. Syntax for magnitude will always be a float ‘mag=3.0-5.0’
depth: depth, de Search for events with depth. Syntax for depth will always be a float ‘de=5.0+’
solution_type: solution_type, st Searh for events with solution type. This will be one of the allowed solution type characters(see Database structure): ‘st=A’
distance_indicator: distance_indicator, di Search for events with distance indicator. This can be one of allowed distance indicator characters(See Nordic format): ‘di=L’
event_desc_id: event_desc_id, ed, eid Search for events with event description id. This can be one of allowed event description id characters(See Nordic Format): ‘eid=Q’
event_id: event_id, id Search for events with their event id. This will be a integer value: ‘id=74123’
Stype - Manage database solution types
This command lets you manage your event solution types with one command. You can list add or remove solution types by using option flags for the command and then the command prompts the user for all necessary values. Possible options for the command are:
- -l/–list: List all existing solution types
- -r/–remove: Remove an existing solution type from the database
- -a/–add: Add a new solution type to the database